TL;DR
– An MCP server exposes tools, resources and prompts to an AI assistant through the Model Context Protocol (Anthropic, Nov 2024).
– Building one takes about 30 lines: pick an SDK (Python FastMCP or TypeScript), define tools with decorators, run over stdio or HTTP, and connect it to a host like Claude.
– Test before shipping with the MCP Inspector, then add it via Claude Code, Claude Desktop or the Customize panel in Claude.ai.
– La Growth Machine open-sources its gtm-system and ships a ready MCP server you can connect in one command: a real example to study or use instead of building from scratch.
You build an MCP server by picking an SDK (Python or TypeScript), defining the tools, resources, and prompts you want to expose, running it over a transport (stdio or HTTP), and connecting it to an AI host like Claude. With the official SDKs, a working server is about 30 lines of code. The Model Context Protocol (MCP) is the open standard, introduced by Anthropic in November 2024, that lets any AI assistant use what your server exposes.
This guide walks through it end to end. Planning, the SDK choice, your first tool, running and testing the server, and connecting it to a host.
The examples use Python with FastMCP because it’s the fastest way to prototype. At the end, we also cover how to install a ready-made server if you’d rather connect one than build it.
What you need before you start
To build an MCP server you need three things: a language runtime, the MCP SDK, and an MCP host to connect to. Nothing else.
- A runtime: Python 3.11+ (used here) or Node.js 18+ for TypeScript.
- The MCP SDK: the official
mcpPython package, or@modelcontextprotocol/sdkfor TypeScript. - An MCP host: Claude Desktop, Claude Code, Cursor or any MCP-compatible client to run your server against.
- Basic command-line comfort. No prior MCP knowledge required.
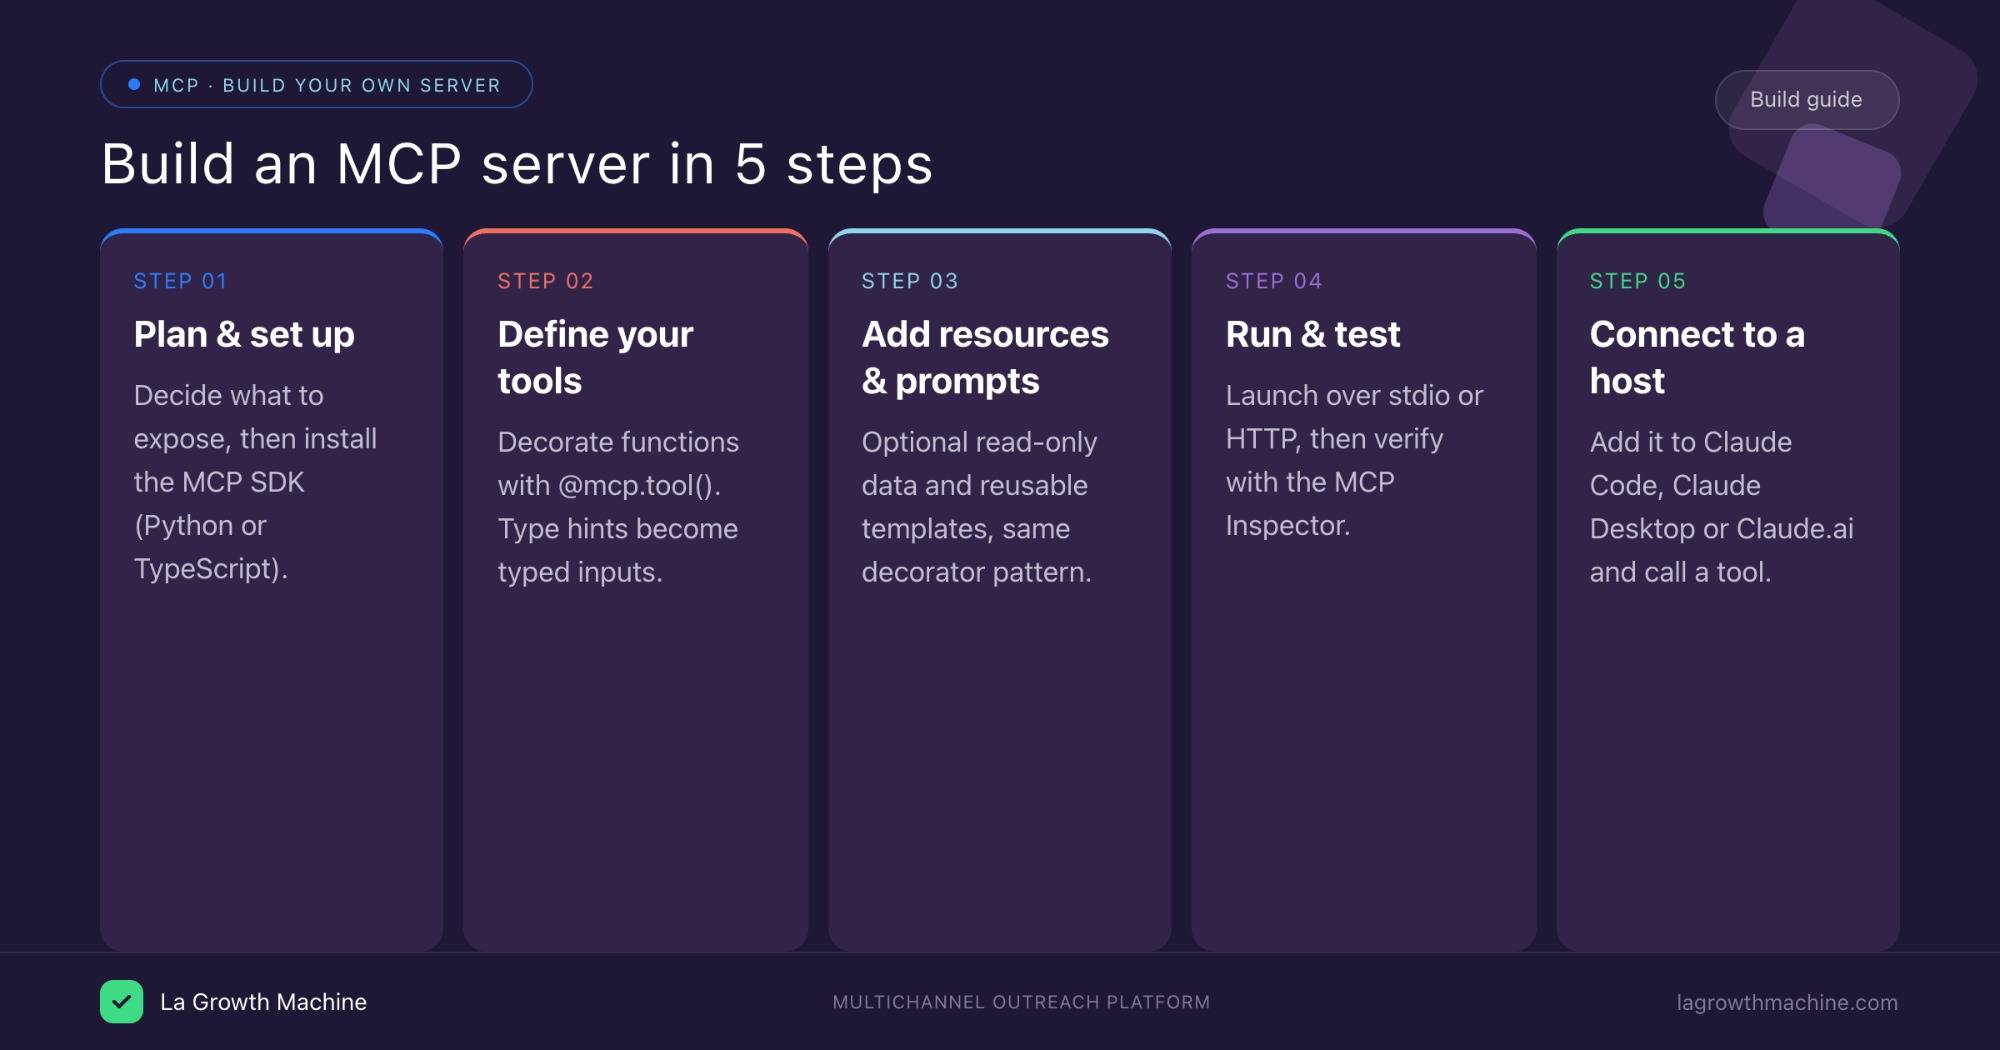
Step 1: Plan what your server will expose
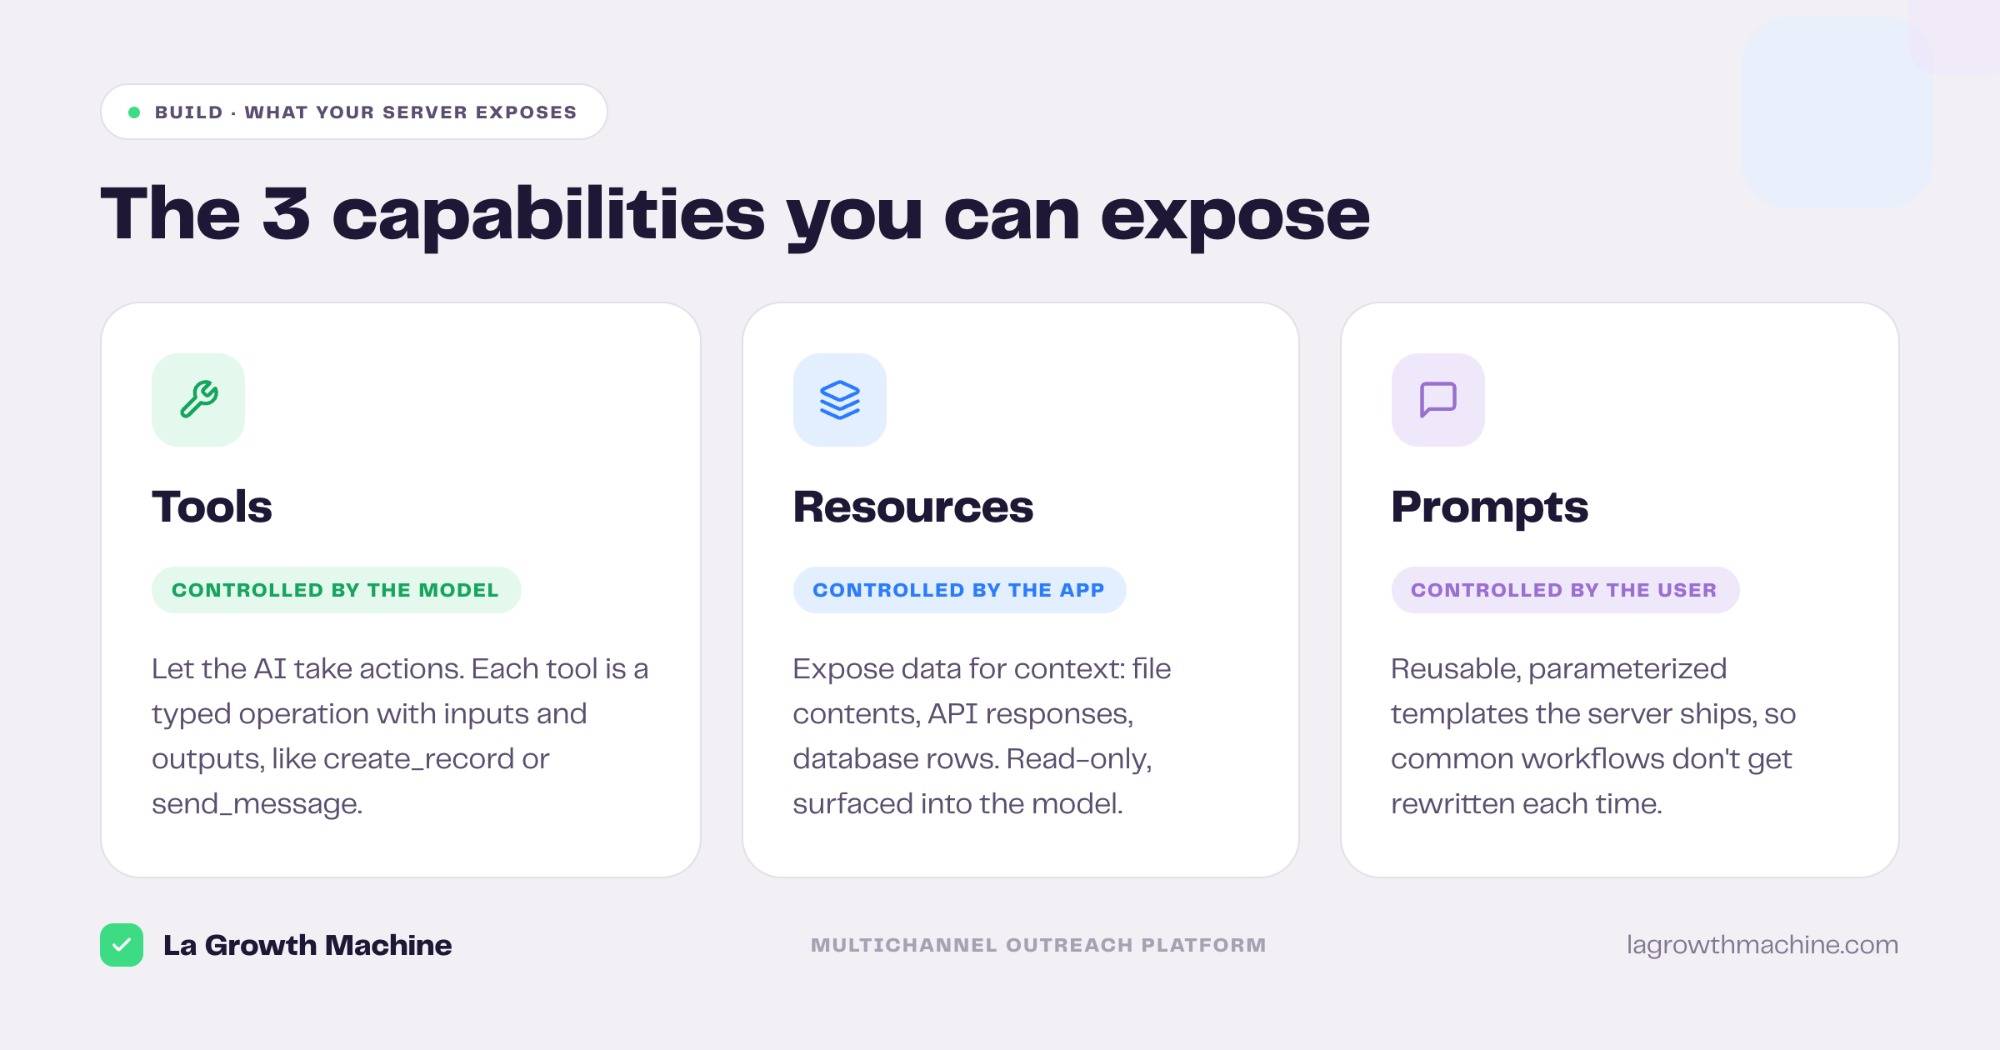
Before writing code, decide what the server should let an AI do. Map each capability to one of MCP’s three types: tools (actions the model can take), resources (read-only data for context) and prompts (reusable templates).
A clear list here keeps the server focused and secure.
For a weather server, the plan is simple: one tool, get_forecast, that takes a city and returns conditions.
Start with the smallest useful surface, a single tool is a valid server.
Step 2: Set up the project and install the SDK
Pick the SDK that matches your stack. Python with FastMCP is the quickest path for prototyping and works well for local stdio servers.
The TypeScript SDK suits Node services and web-facing tools. This guide uses Python.
Create a project and install the SDK:
uv init mcp-weather
cd mcp-weather
uv add "mcp[cli]"
If you don’t use uv, a plain pip install "mcp[cli]" inside a virtual environment works the same way.
Step 3: Define your first tool
A tool is a function the AI can call. In FastMCP you create a server instance and decorate a Python function with @mcp.tool().
The function’s type hints become the tool’s typed inputs, and its docstring tells the model what it does.
from mcp.server.fastmcp import FastMCP

mcp = FastMCP("weather")

@mcp.tool()
def get_forecast(city: str) -> str:
    """Get the current weather forecast for a city."""
    # Replace this with a real API call
    return f"Sunny, 22°C in {city}"

if __name__ == "__main__":
    mcp.run()
That’s a complete, runnable MCP server. In production, the body of the tool is where you call a real API or query a database. The placeholder return becomes an HTTP call to a weather provider and FastMCP handles exposing it to the model.
Step 4: Add resources and prompts
Beyond tools, an MCP server can expose two more capability types.
Tools take actions, resources provide read-only data for context.
Prompts are reusable templates.
You add them with decorators, the same way as tools.
@mcp.resource("config://units")
def get_units() -> str:
    """Expose the unit system as readable context."""
    return "Celsius, metric"

@mcp.prompt()
def weather_report(city: str) -> str:
    """A reusable prompt template for a weather summary."""
    return f"Write a short, friendly weather report for {city}."
Tools are model-controlled, resources are application-controlled, and prompts are user-controlled. Add only what your server needs.
Step 5: Run the server and pick a transport
An MCP server runs over one of two transports. stdio runs the server as a local process on the same machine as the host, which is the common choice for local tools. Streamable HTTP runs it remotely over HTTP, which is how hosted servers connect. FastMCP defaults to stdio when you call mcp.run().
Start it from the terminal to confirm it launches:
uv run main.pyFor a remote server, you run it as an HTTP service and authenticate connections with OAuth or an API key instead of launching a local process.
Step 6: Test with the MCP Inspector
Test the server in isolation before wiring it into a host. The MCP Inspector connects to your server and lets you list and call tools, resources, and prompts without a full AI client, which is the fastest way to catch a broken capability.
uv run mcp dev main.pyOpen the Inspector, call get_forecast with a test city, and confirm the response. Fix any errors here, where they’re easy to see, rather than behind the AI layer.
Step 7: Connect it to a host
The last step is making a host use your server. There are two ways, depending on which Claude you run.
For Claude Code, add it from the terminal:
claude mcp add weather -- uv run main.pyFor Claude Desktop or Cursor, add it to the JSON config:
{
  "mcpServers": {
    "weather": { "command": "uv", "args": ["run", "main.py"] }
  }
}
For Claude.ai or Claude Cowork, you don’t edit files: open the Customize panel, add the connector with its URL plus authentication, and approve it. Restart the host, ask the assistant something that triggers get_forecast, and confirm it calls your tool.
How to install a ready-made MCP server
You don’t always have to build one. Most teams connect existing servers and installing a hosted MCP server takes a minute.
Here’s how, using the official La Growth Machine MCP server as the example. La Growth Machine is an outreach platform that connects multichannel campaign execution to proven revenue impact, and its MCP server is hosted at https://mcp.lagrowthmachine.com/mcp.
In Claude Code, add the remote server in one command:
claude mcp add --transport http lgm https://mcp.lagrowthmachine.com/mcpIn Claude.ai or Claude Cowork, open the Customize panel, add the connector with the same URL plus authentication, and approve it. No files to edit.
Once connected, you run multichannel outreach in plain language, “build an audience of CMOs in SaaS and launch a LinkedIn plus email sequence,” and read pipeline generated and meetings booked straight from the conversation.
It’s also a useful server to study, La Growth Machine open-sources its gtm-system repo, so you can see how a real server wraps a product, maps tools to actions, and handles authentication, then borrow the patterns for your own.
The full server lives on the La Growth Machine MCP page.
Common mistakes to avoid
A few things trip up first-time builders. Knowing them up front saves hours.
- Skipping the Inspector. Wiring an untested server into a host hides errors behind the AI layer. Test first.
- Vague tool docstrings. The model relies on the docstring and type hints to decide when to call a tool. A clear, specific description matters as much as the code.
- No confirmation on write actions. If a tool modifies data or sends messages, make sure the host confirms before destructive operations.
- Over-scoping permissions. Expose only the tools and data the server needs. A server with broad access is a broader risk.
Frequently asked questions
What language should I use to build an MCP server?
Python with FastMCP is the fastest to prototype and ideal for local stdio servers. TypeScript suits Node services and web-facing tools. Both have official SDKs.
How long does it take to build a basic MCP server?
A minimal server with one tool is about 30 lines of code and a few minutes. Wrapping a real API with several tools and authentication takes longer.
Do I need to know how MCP works internally to build a server?
No. The SDK handles the protocol. You define tools, resources, and prompts with decorators, and the SDK exposes them over the transport.
How do I test an MCP server?
Use the MCP Inspector (uv run mcp dev main.py). It connects to your server and lets you call its tools, resources, and prompts without a full AI host.
How do I install an existing MCP server instead of building one?
In Claude Code, run claude mcp add --transport http . In Claude.ai or Claude Cowork, add it as a connector in the Customize panel with its URL and authentication.
How do I connect my MCP server to Claude?
Use claude mcp add in Claude Code, a JSON config entry in Claude Desktop or Cursor, or the Customize connectors panel in Claude.ai and Claude Cowork.